Step 1: Select a platform
In our previous posts we covered the benefits and the key steps along the path of the implementation of an AI Chatbot. But for those willing to get their hands dirty and start building, here’s a very simple “getting started guide”. NOTE that this guide is not intended as an instruction guide of how to build a complete system, it is merely intended to get you started so you can experiment and learn.
To get started, you don’t need to be able to code. You should obviously learn about GenAI solutions and have a basic understanding, but there are no-code platforms to get you started. In this example we will use FlowFoundry’s FlowStudio because it gives us the UI to design plus private LLM’s and a private vector database at a fixed price, but you could equally look at solutions such as Verctorshift, or Flowise with Pinecone as database or others. The key components that you will need is access to a LLM such as ChatGPT, access to a vector database, and in our case access to a no-code platform. For testing, feel free to select any platform that suits you needs, but for production keep in mind the business models of the platform so you keep on managing cost as well as other regulatory requirements you may have.
Step 2: Define your scope and desired customer experience
See our previous posts for details, but in essence you need to define what you want to achieve. For the sake of this simple example today, we will use a simple example, using a product webpage and a product manual (document) as examples of information you would want your chatbot to know.
In terms of scope, all we want this example chatbot to be able to do is to help us with questions related to the product specifications and provide us with a link to the product page.
This simple example is naturally by no means all that you would need to consider for a webshop Chatbot, but it is a good start.
In terms of experience, we want the customer to be able to get information on the product, but we do not want the chatbot to provide any responses to non-relevant information and we also don’t want the system to “invent” answers, or what we tend to call “hallucinate” (we will see later how to avoid that).
3. Let’s build a simple prototype
The best way to learn is to do and experience yourself. So, let’s get on with it. We are using FlowFoundry FlowStudio in this example with ChatGPT as the LLM to show the mix and match of private and cloud-based approaches, but feel free to use your own solutions.
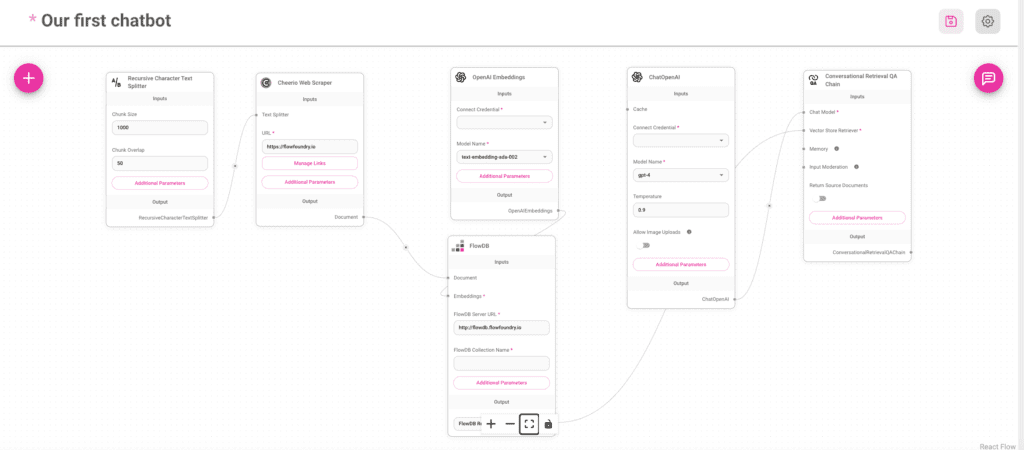
Luckily FlowStudio offers us complete starter flows that we can use “out of the box” and then edit. I picked a web chatbot flow and was presented with the following (see image below); let’s take a closer look at what we have.

You may need to zoom into the image, but FlowStudio offers us much of what we need right out of the box. These components are:
- A graphical flow designer together with a collection of tools (the ‘+’ in the top left corner) that we can add as needed.
- A chatbot interface (pink, top right), the ability to ingest content (green, top right), settings, and the ability to get code you can either run or embed in your site once you are done with the flow. Nice!
- Looking at the flow itself, we see that we have the following components in our default flow:
- A webscraper that allows us to scrape pages or entire websites, so this could be an option for ingesting content from a website or webshop, although document-based content would be preferred. This component could be replaced or augmented by a range of other import components, importing data from documents, databases, and more.
- A text-splitter which separates the content into “chunks”. When dealing with text-based systems we don’t use sentences, but “chunks” of text. Leave the settings default unless you know what you are doing.
- A vector database, in this case FlowDB, that allows us to store the chunks of text in a database. A vector database is a type of database that allows us to store the necessary information derived from the text, such as also the “embeddings” or vector representations of the text. The database also allows us to keep track of conversations such that the chatbot can respond intelligently with an inherent knowledge of the chat history.
- The OpenAI Embeddings component is the component that generates the embedding for us that we can then store in the vector database.
- The Chat OpenAI component that provides a wrapper around the ChatGPT LLM.
- The conversational retrieval chain then finishes off this flow, providing the chat interface and the prompt settings under “Additional Parameters”. At this stage it is merely set to being a helpful AI agent and not to respond to questions outside of the scope of information provided.
- Note that defining the right prompt (also referred to as “prompt engineering”) is a bit of an art and certainly makes a difference. Here is a good little guide that can assist you in compiling the right prompt. Additionally there are platforms such as PromptPerfect that can also assist you with defining the best prompt and testing it.
- A webscraper that allows us to scrape pages or entire websites, so this could be an option for ingesting content from a website or webshop, although document-based content would be preferred. This component could be replaced or augmented by a range of other import components, importing data from documents, databases, and more.
Out next step is to tune the flow to make sure it does what we expect it to do, so let’s get started. For this sample flow I have decided to ingest the website of a Gardena robotic mower and loads its user manuals (feel free to replace with your own example). So going over the flow, this is what we need to tune:
- First, we must add our credentials to the OpenAI components. You will get this API key from your OpenAI account. Note also that the “temperature” of the ChatOpenAI has been adjusted to 0.4. Without going into detail as to what this means exactly, it essentially prevents the model from “inventing” answers or “hallucinating” as it is commonly referred to.
- Secondly, we must adjust the URL in the webscraper to the site that we wish to ingest content from. Make sure you only include the relevant links so the Chatbot only loads the data we want it to know about.
- Thirdly, we need to add a document loader to load our manuals. Click on the ‘+’ button on the top left and add a “Document Loader” to your flow. In my case I am using a PDF loader, but if you are loading a Word or text file, you may need to add a different loader. Then connect that loader to the text splitter and the vector database (FlowDB), upload your files and save the entire flow.
- Our final step is to ingest the information into the vector database such that the Chatbot can access it. Use the green button at the top right of your user interface to “upsert” the data. This may take a while depending on the volume of content, but you will get a confirmation once the content has been loaded.
And that’s it; your first simple Chatbot ready to get going!
Step 4: Testing
Our next step is to test the Chatbot, making sure that it is able to answer questions we want it to answer while not providing false information or responding to non-relevant questions.

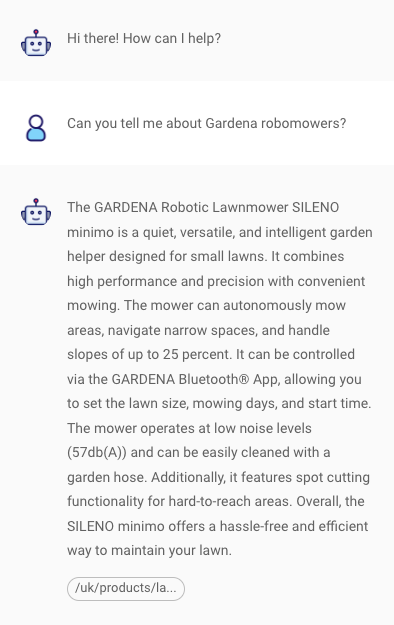
Here’s a sample output. Note that I have also asked the bot to return the link where the information is from, something you can enable on the Conversational Retrieval Chain tool if so desired.
While this is a simple system, when developing more complex flows you may need more extensive tooling to understand what your flow is doing. Most platforms, including FlowStudio, allow the integration with tools such as Langchain that you can use for debugging and understanding the details of what your bot does.
Step 5: Tuning and Deploying
Once the bot has passed QA, you are ready to deploy. You may want to change the messages that it provides during the first interaction with the customer if it does not know the answer and many more. All of this is configurable, but for now, we are leaving it using default values.
Finally, when deploying, you need code to either run or embed in a website. Select the “</>” icon on the top of the screen to select the code component that you need from a range of options, including Web embedding, Python, JavaScript, and more and embed it in your environment.
Summary
While this was admittedly very simplistic example, it does illustrate how simple it is to architect and prototype Chatflows and how quickly you can get that integrated into your webshop, customer support flow, and more. Naturally you need to have an understanding of the tools and technologies involved, but today’s platforms offer the ability to rapidly test and deploy a wide range of AI flows in an effective manner. What rests is to select the platform that meets your needs in terms of cost, flexibility, data privacy, and getting going.

